How I Wet Finish Weaving Projects
This post is based off a reply I gave to this Tumblr thread asking about wet-finishing advice for handwovens. The Tumblrite above me gave excellent instructions for gently hand-washing items, a practice I respect but don't use myself. I've edited a bit for clarity and added a few extra things I didn't think of at the time.
My reply
What @crow-crafting said is a great approach for most weaving, especially if your yarn is prone to fulling (felting, but with spun fibres) and you want to be able to control that process completely. The only thing I'd add is that if you're hanging it to dry, it can really help to hang it over a thick bar or rod rather than just a regular washing line. Some yarns will take offence to the line and set a permanent crease if it's the first time they've been washed.
Personally, I tend to be more aggressive with wet finishing. I know I will never have the executive function to consistently hand wash whatever I've made, so I wet finish my weaving at least as aggressively as I expect its future washings to be. Which means I almost always do samples before getting into the actual project.
Disclaimer: I weave a lot more yardage than I do scarves, so my process is built around the expectation that I'm going to be weaving A Very Big Thing and I want it to turn out right at the end. I probably wouldn't be so extra about stuff like scarves unless I wanted to play with weft colours for a bit first.
When I'm warping a project, I'll add at least an extra half metre and use it to weave samples at the start. I sometimes need to try different weft colours, but when I've decided which I like, I weave at least 8 inches. I then cut the sample off the loom and re-tie the warp. Peggy Osterkamp's blog has a tutorial on how to do this here: https://peggyosterkamp.com/2020/04/cutting-off-some-of-the-cloth-before-the-warp-is-finished-the-two-stick-heading/
Then, I cut that sample into three pieces and finish the raw edges. The first bit goes straight into my weaving project book - "loom state". The second I wash using the wool or delicates setting on my machine - "gentle wash". The third I throw in the wash with the regular laundry (bonus points if there's a pair of jeans in there too) - "aggressive wash". HINT: sew a contrasting thread into the hem of one of the washed samples, and note down which one, so you don't get them mixed up later. I always sew a contrast thread into the "gentle wash" piece and leave the "aggressive wash" piece bare.
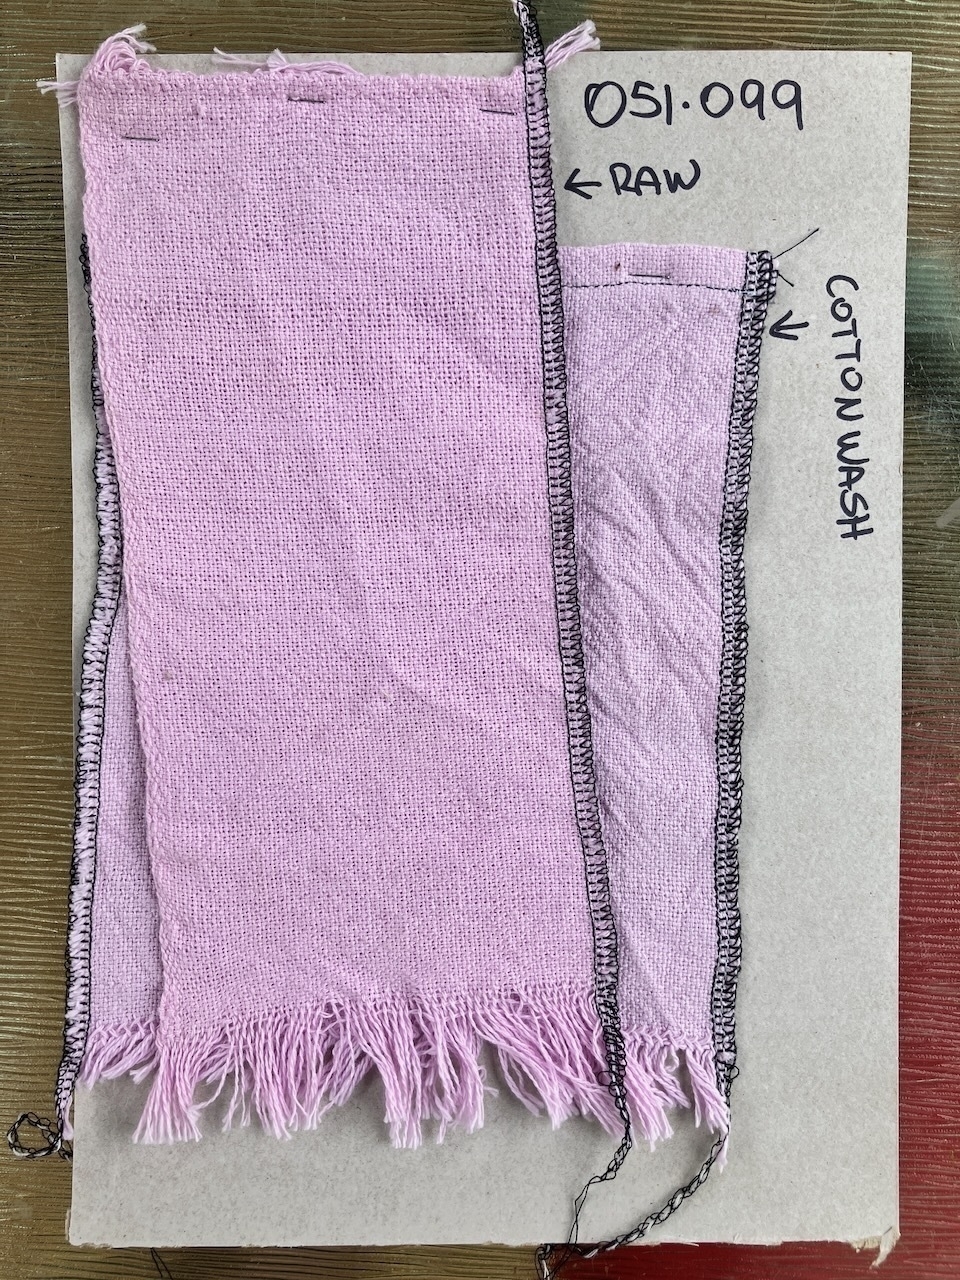 |
| The number in the top right corner is the project number. I use it to easily cross-reference between my digital and physical notes. |
I have a front loader, so it's all very hands-off for me. Some people wet finish in their top-loading machines and babysit the fabric the entire time, pull it out when it's at the right level of "done" for their liking, and then spin the water out, iron, etc. The takeaway is to experiment, and do whatever works for you.
After washing, I let the pieces dry a bit, but not completely. I iron them while they're still damp so they don't set wrinkles - this is less a problem with, say, knitting yarns than ones sold specifically for weaving, but it's still something that can happen.
After that, I compare samples and decide which one I like more. This is a very personal thing. Often both samples turn out good fabric - they might just be suited to different applications. Since I mostly weave garment yardage, I'm generally looking for a denser, sturdier fabric than if I was weaving scarves or wraps. I also note the amount of shrinkage, and if it was more or less than I expected.
If there's little or no difference between the samples, I usually plan for the aggressive wash because then I know that whatever I make will likely survive whatever it gets thrown into.
What about inkle bands?
I don't usually wet finish these, unless I'm specifically weaving them as trim or facing for a garment. (If I'm honest, I rarely remember to wet-finish them before I apply them to the garment, either.) Both tablet weave and heddled bands are quite stable in their finished state, so shrinkage from wet finishing tends to be minimal to non-existent.
That said, 99% of the time I'm weaving bands with 100% cotton in a variety of weights, or poly-cotton sewing threads. If I was doing a band silk or wool, I'd be more inclined to weave a good long test piece - at least half a metre but preferably double that - and throw it through the same kinds of wash the finished garment will go through. I probably wouldn't iron the band unless it was going on a garment that I was planning to iron on a regular basis. (There are currently zero clothes in my wardrobe that fit this criteria, just so we're clear.) If you wanted to be thorough, taking accurate before and after measurements would help. I'd personally be looking more at how the wash affected the quality and hand of the band, and just planning to weave extra. (One can never have too many bands.)
The nice thing about weaving is that there's really no one right way to do anything - if you get a result you like, then you did it the right way. And it's good fun playing around and learning new stuff, so don't be afraid to experiment!
No comments:
Post a Comment