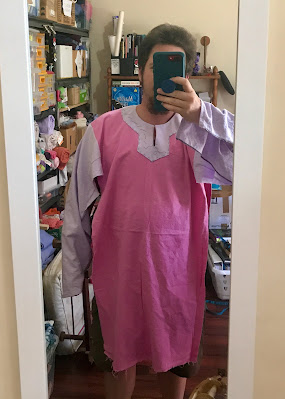
I made this set of pyjamas back in March. (It is a measure of how well my year hasn't gone that I'm only just getting to posting about them.)

Considerations
Since this is for a kid that is both growing rapidly and extremely attached to their clothes, I made them with plenty of room to spare. That is to say, they fit me. If said child grows out of them before they wear out, I will be shocked, appalled, and probably broke from the food bill.
Said child is also firmly in camps Tags Are Bad and Clothes Are Itchy. So I went with 100% cotton flannelette, which is both soft and slightly fluffy. The lavender used to be a single bed sheet, and the pink is a fabric remnant. Both came from our local Savers (a for-profit second-hand shop that distributes some of its profits to various charities).
Construction
Since this tunic isn't intended for historical re-enactment, I got to have some fun with the colours. Tunics, cotehardies, and the like from the period I re-enact (1350-1450, Europe) come in essentially two flavours - solid (one fabric, sometimes with applied trims or embroidery/applique) and parti-colour (two fabrics/colours, split down the vertical axis). Given the size of the pink remnant, it made sense to use that for the body (cut as one piece), and the lavender for the rest.
 |
| Yes, my drawing skills are terrible. The iPad and I are still becoming friends. |
Here's the cut list for the pieces needed:
- Body: 21" wide, 76" long
- Sleeves: two, 26" x 16" (I usually cut these at the same time, on the fold, and then cut through the fold. It's easier to get two sleeves the same size that way.)
- Arm Gussets: formed from the triangles cut off the sleeves to taper them from elbow to wrist
- Gores: two, 10" x 29" (Again, I cut these together on the fold, then cut the fold and the diagonals after.)
- Neck Facing: about 7" longer and wider than the neck hole and slit (I didn't calculate this before-hand. It was easier to eyeball the right sized piece of fabric once I'd cut the neck hole and slit.)
Sleeves and their gussets
After everything was cut out, I started by trimming the sleeves to create a nice taper from elbow to wrist. It's important to mark the elbow point correctly - if you cut off the wrong sized triangle, you might not have enough room to bend your elbow afterward. When in doubt, move the "elbow point" closer to the wrist by an inch or so - it's easier to hem from the wrist end than from the shoulder end, once the sleeve is attached to the body.
I've found that for under-tunics with tapered sleeves, you can often take the two triangular pieces cut off the lower arm, rotate them, and attach them at the upper arm in lieu of using a square gusset. This is extra useful if you're tight on fabric, and it ends up looking more like a modern arm construction when worn. I also find it easier to sew than a square gusset, especially by machine. (I almost always do all my gussets, and gore points, by hand - I like the greater control, and I get a nicer finish.)

I like to start construction by sewing the triangle sections to the sleeves, and finishing the raw edges. Then I can treat the sleeve as one piece while sewing the rest of the garment. In this case, I overlocked the gussets to the sleeves and continued down to the wrist. (Easier than doing a felled seam, though less strong.) I then basted the sleeves in place on the body piece. I find it easier to attach the sleeves while the body is flat, and then sew up the sides. I used a half inch seam allowance on all seams, to allow plenty of space for hand felling them after the construction seams were sewn.

Decorative neck facing
Usually the neck hole is the first piece of work I do on a garment. Once it's finished, it's much easier to try things on as you go, and adjust size and seam allowance as needed.
But I hadn't decided how I wanted to treat the neck when I started this project - in the past I've simply cut a neck hole, cut enough of a slit to get a head through said hole, and then finished the whole business with a small rolled hem. This seems to have been the most common method of finishing linen tunics in my time period. But, it can be fiddly, and I didn't really want to deal with that kind of fiddly for this project.
So I decided to try out Opus Elenae's tunic neck facing tutorial instead. I found the video clear and easy to follow, and the end result is wonderful. While it's out of period for my re-enactment kit, it's a technique I'll be using for other clothes in the future.
 |
| The facing in progress. I've sewn around the neck hole and slit, clipped the neck curve and angles, then turned it to the right side and pressed flat. |
Checking the neck facing for fit. I basted down the outer edges, and then whip-stitched them in place. This style of facing was often embroidered before being applied to the garment - I'll definitely be trying that in the future.

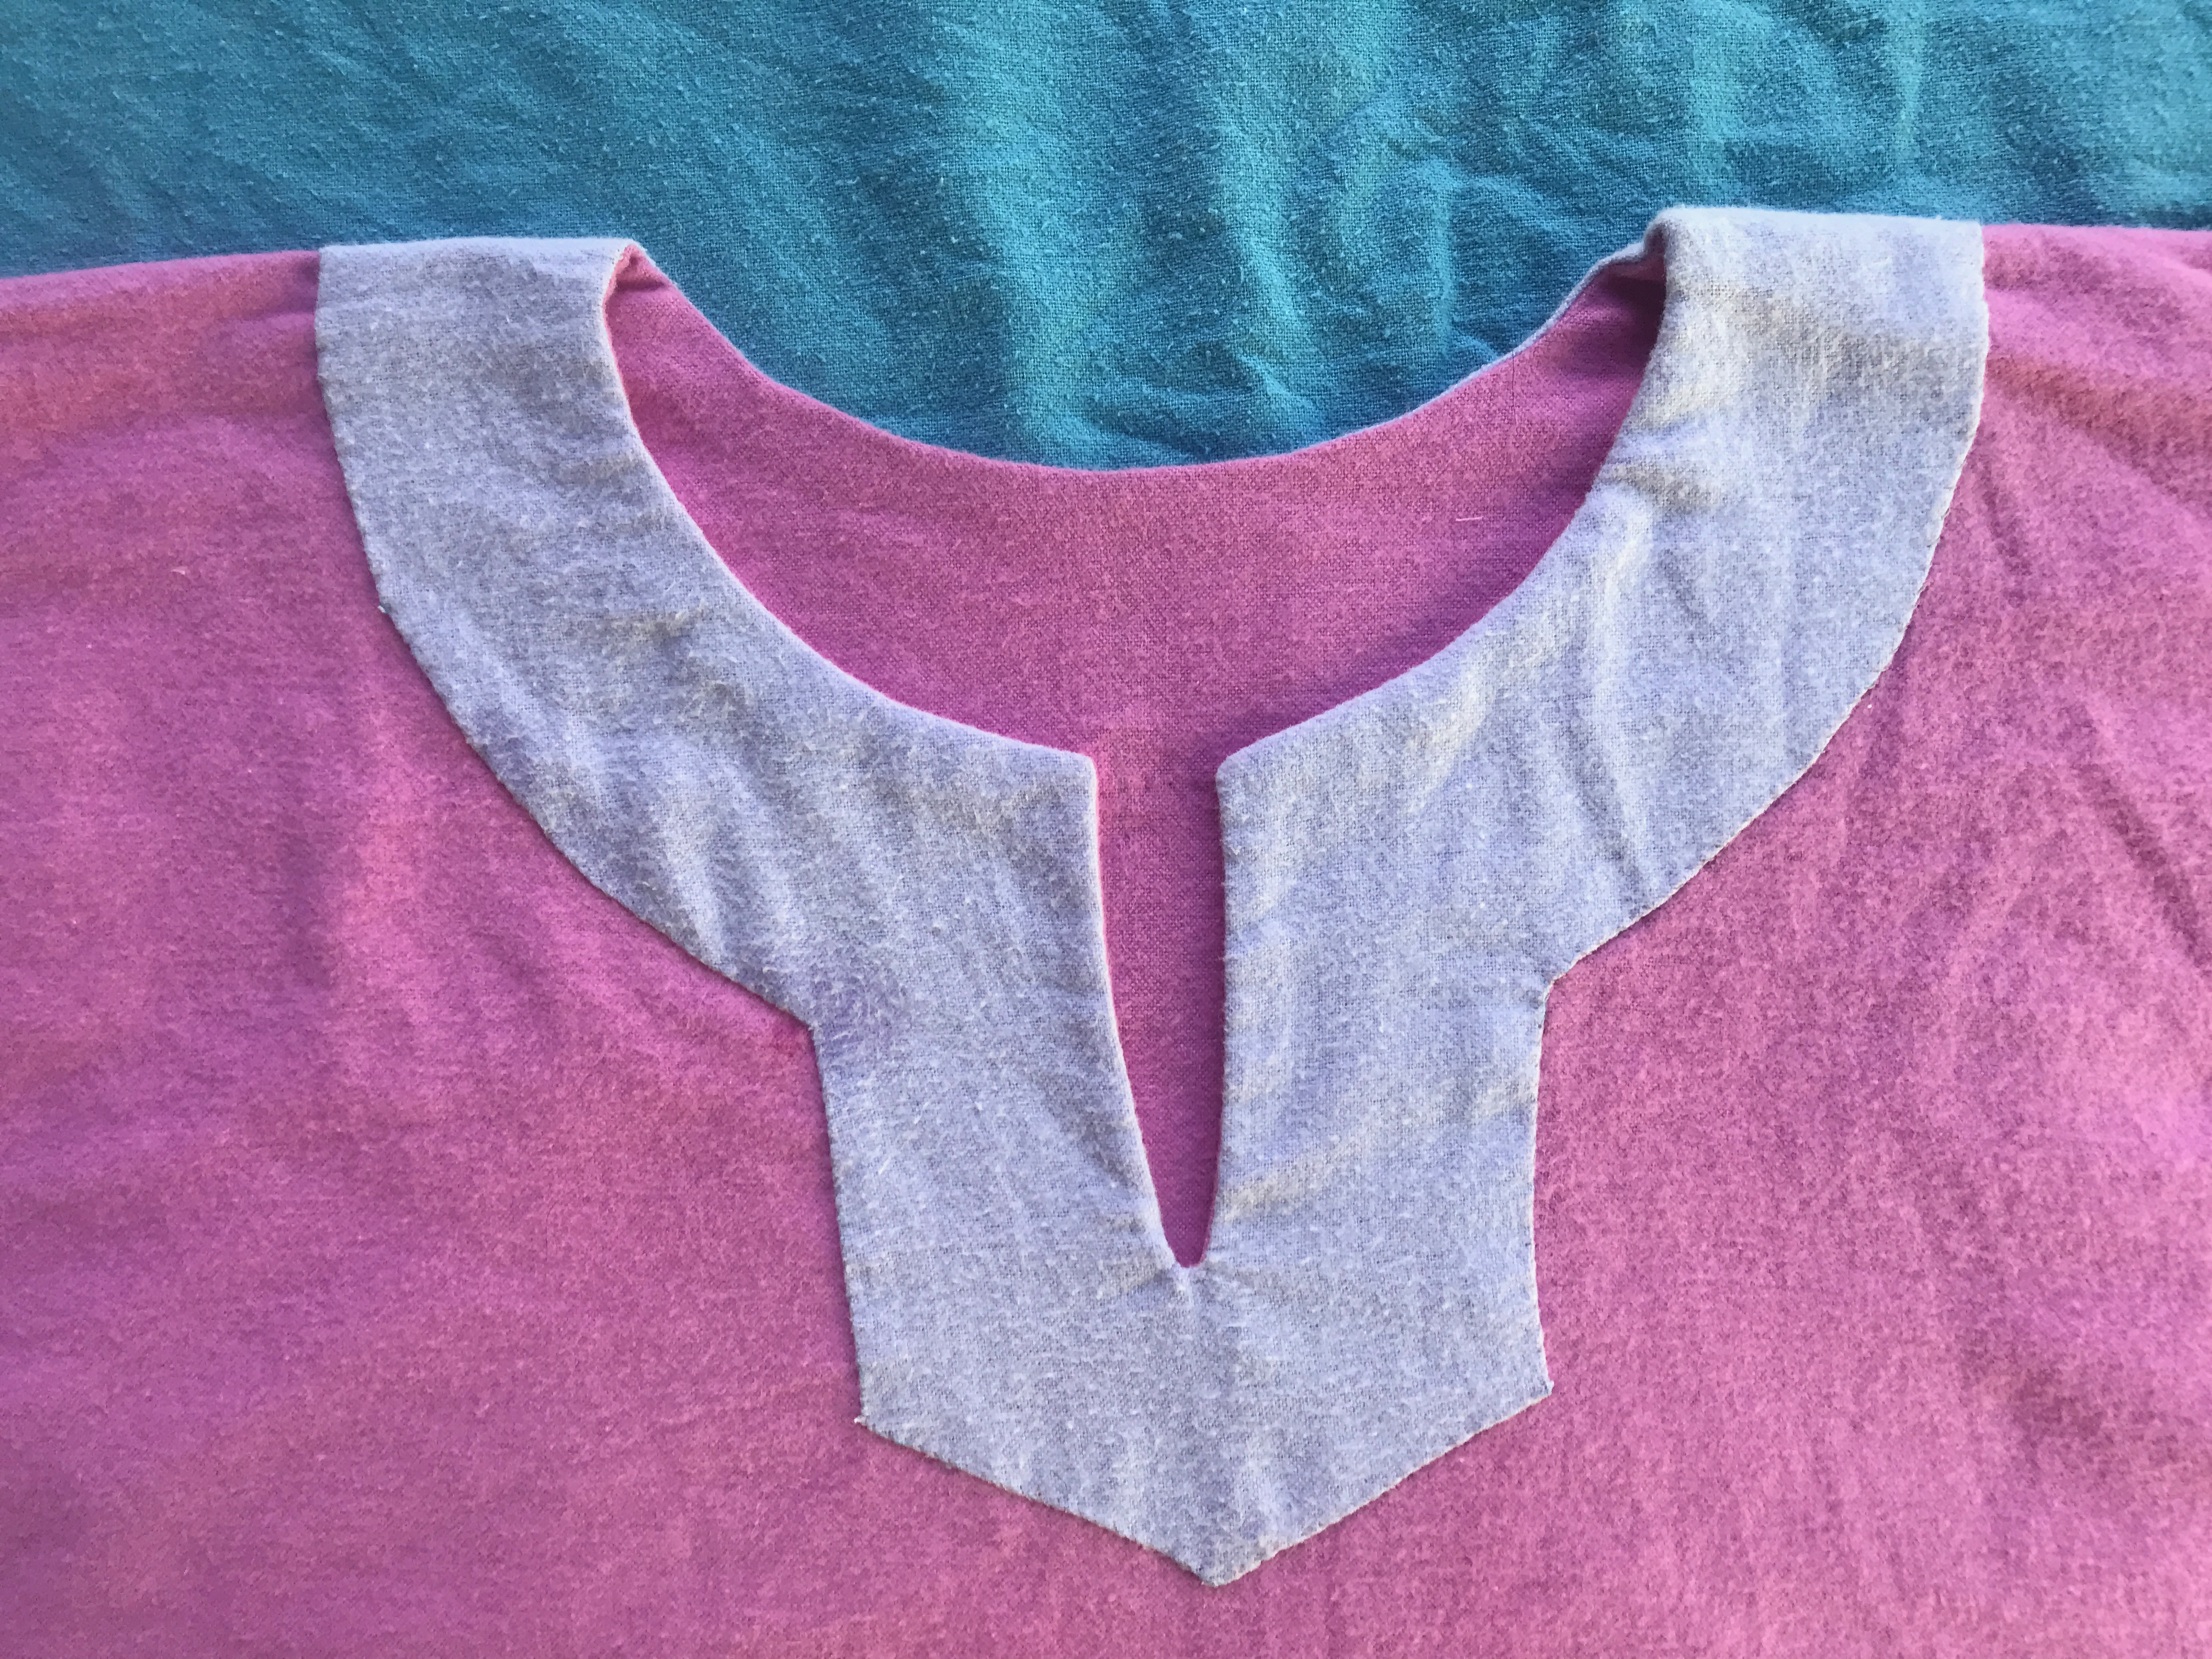 |
| The finished facing. In future I'll deepen the bottom of the V at the neck slit, to make it look more balanced. |
Gores
While you can cut the body piece as a trapezoid to add extra swoosh around the hemline, I generally prefer to add triangular side gores as they let me use my fabric more efficiently. Here's how I typically make them:
Stack the two rectangle pieces on top of each other.
Mark a diagonal line that starts and ends 1cm (½") in from the long edge. Cut along this line to make two sets of long, skinny right-angle triangles with their tips cut off.
If your fabric is the same on both sides (mine almost always is), leave the triangles stacked on top of each other. Sew the long, straight edge with a 1cm (½") seam allowance. This will leave your gore with a nice point at the tip, despite what the seam allowance makes it look like.
If your fabric has a right side and a wrong side, you'll need to swap the triangles around so that all the right sides are together. Then sew the long straight edges as above.
Either way, finish the middle seam however you like.


Putting it all together
Once the gores were together, I basted them in place at the side seams. I use a half inch seam allowance when hand sewing, so that I can easily fell the seams down afterward. When I remember, I also offset one of the seams by a quarter inch, so that I don't have to trim the allowance before felling it.
If I'm machine finishing (ie overlocking) the edges, I'll usually use a quarter inch seam allowance on everything. It doesn't matter much to this style of garment, as long as it fits the chest and shoulders. To make sure of the fit, I baste along the intended seam allowance before I commit to the real sewing. (Basting with thread is just as fast as using pins, and you don't poke yourself while you try things on.)
Tip: if you baste with the same colour thread as your garment, you don't have to take out the basting thread later. I do that when machine sewing the seams. I usually use a contrasting basting thread when hand-sewing, and pull it out as I go.
I forgot to take any photos of the next steps, probably because they're the bulk of the construction work and feel like they take foooorever. From here, it was mostly a matter of sewing some seam, then felling some seam, then doing it again on a different seam. It doesn't have to be all backstitch, either - even on cotton fabric, I use small running stitches on everything that won't get a lot of stress (the long vertical side seams and the underarm seams). Gussets, shoulders, and the tips of gores all get backstitched so they're nice and strong.
Some people prefer to sew each triangle of the gore to the body seams while they're separate, and then sew the middles of the triangles together after. I've found that I'm more likely to put the triangles the wrong way around (sewing bias edge to bias edge, instead of bias edge to straight edge) if I do it that way.
It also means I can't run the gore into the armpit to create extra chest and arm room - a trick I tried after someone shared a re-enactment photo (which I of course cannot find now that I'm talking about it) that used that technique in lieu of square gussets on a woman's gown. It's not necessarily an easier technique than square gussets (working out how to fell the seams so they lay nicely is a challenge), but I like the way the end result looks and feels, especially when combined with triangle gussets made from the sleeve offcuts.

To sew this gore-end and triangle-gusset combination, I started at the bottom hem and sew up one side of the gore, stopping about three inches (7.5 cm) away from the point. I don't finish off - simply pull the needle out and leave the rest of the thread so I can finish sewing the rest later. Then I went back to the bottom and sewed the other side of the gore.
Once I was a few inches from the tip on the second side, I spent some time adjusting the body, arms and sleeves so they all matched up well. I then sewed one side of the gore the rest of the way, just to the tip, making sure I've marked that point well so I don't go too far into the seam allowance. I cut that thread, then went back and sewed the other side into position. Then I kept going down the sleeve to the wrist.
I repeated all that on the other side, and the construction seams were done. All that remained was folding, pressing, and whip stitching all the edges so that they don't fray.
I won't lie, finishing the seams by hand takes at least three times longer than sewing the seam in the first place. Even though a hand-sewn and hand-felled seam is stronger than a machine-sewn and finished one, if I didn't like the way they looked so much, I probably wouldn't do them. But I do really like the way they look.

A Quick Cheat Sheet for the Seam Sewing Order
- Cut and finish neck hole
- Sew and fell the triangle gussets to each side of each sleeve, make sure that the diagonal (ie bias) edges of the triangles are sewn to the straight edges of the sleeves
- Sew sleeves to body, don't fell the seams yet
- Sew one side of gore to within 3" of tip, go back and sew the other side
- Pin or baste the gore tip and the sleeves into position. Take your time to get the seams aligned correctly
- Sew the last few inches of one side of the gore. Make sure to stop at the tip, before the seam allowance
- Sew the other side of the gore to the body/sleeve, continue down the sleeve to the wrist
- Repeat with the other gore
- Finish seams (I fold to one side and fell down with whip-stitch)
- Make sure bottom hem is straight and level, trim if needed. Fold, press and sew hem (I usually do a double fold and then whip-stitch)
- Do the same with the wrists
- Admire your finished tunic, and marvel at the ridiculously tiny amount of scrap created from the project
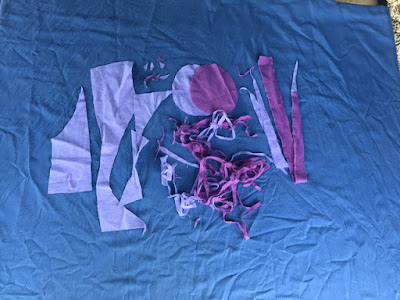
This is all the scrap that was left after squaring pieces and trimming the hem. And this is why I love rectangular construction methods.

Costs
The pink fabric cost me $4.99, and the lavender sheet was $2.99. I used just over half the pink remnant for the body, and less than half the sheet for the sleeves, gores and facing. I'd estimate the fabric cost was about $4.
The thread I used was from the stash, and I couldn't tell you if I bought it or if it was a de-stash gift (tracking these things with thread is harder for me than with notions or fabric). I'll throw in a high estimate of $2 for thread. So all up this tunic cost about $6. Not bad for a garment that should last at least five years.
Unfortunately I didn't keep good track of hours with this one. (Finding a time tracking system for sewing that works for me has been harder than I expected.) I worked on it a total of 12 days, but only two of those have times attached (95 min and 75 min). I'd ballpark it at 20 hours or so, based on previous projects.
All up I'm very happy with how this turned out. The kid is too - They basically lived in it over winter, when they didn't have to put "real clothes" on. (They declined action shots, hence the one lonely photo of the finished garment hanging on the fence.)
No comments:
Post a Comment