I'm in the process of making myself a new shirt. It's square cut, which is my favourite type of shirt construction. I've had a fair amount of practice with this style of garment, what with all the t-tunics I've made for medieval re-enactment, though making a shirt is involves more steps. It's all measuring things and cutting out the right sized rectangles, so there's no fiddling about with pattern pieces (which I despise). Best of all, despite being a fairly simple construction method, there's a surprising amount of room for tweaking the design of the final product.
While I like the idea of the "pirate shirts" that are everywhere nowadays, I live the kind of life where Dramatic Sleeves™ are a drawback. So I wanted something that uses the idea of rectangular geometry, just with a bit less flamboyance. Conveniently, history provided.
I'm making this current shirt in a vague semblance of the 16th century style - that costume gap between Tunics For All (up to about the end of the 1400s) and Ye Olde Pirate Shirte (ubiquitous in most of Europe from about the 1600s). Morgan Donner has a post/quasi-tutorial here.
The fabric is a light, sage green cotton-linen blend that used to be the top half of a doona cover. It's a lovely fabric - it drapes nicely, it takes finger pressing well, and it's light but not see-through. (I liked it so much that when I found the same doona cover in a different colour in the op shop, I bought that one as well.)
But, lovely as the fabric is, it's also a little - plain. A little boring. In need of a little embellishment.
Now, usually when I think this, my brain immediately comes up with the most complicated and time-consuming solution to the problem it possibly can. That's the reason I'm currently embroidering 30 squirrels onto the sleeves of the first square-cut shirt I started making. Four months ago.
 |
| It's coming out fantastically, but my time tracking suggests I'll end up spending more time on the embroidery than the sewing of the shirt. |
- This time, when I found myself thinking "it's going to be a bit plain," I mentally grabbed me by the scruff of my neck and said "self, you are absolutely correct. Embellishment is one of the delights of human civilisation - it's one of the ways we know we're human. Our ancestors have been making things pretty since before we learned to weave fabric. One could say that the urge to decorate ourselves and our surroundings is one of the quintessential human needs, right there on Maslow's hierarchy between safety and wifi. I understand and respect our drive to express ourselves through our costume.
"But self, if you try to make me start yet another months-long decorative project when I just want a nice, long-sleeved shirt to wear before it gets too hot to wear sleeves, I will end you."
To my shock and delight, I actually listened to me. Any and all embroidery plans were banished to the furthest reaches of my subconscious, where they can sit and stew while I just make myself a damn shirt. So I canned both the blackwork and the "hem pieces then attach" construction method of the tutorial, and settled for some plain sewing. (A little too plain, my brain kept insisting.)
Conveniently for my embellishment-loving brain, I've also started weaving bands on my inkle loom recently. Previously, that loom was strictly for tablet weaving - I didn't understand how inkle heddles worked, and I had no spare brainpower to figure it out, so I just kept doing what I was comfortable with. But I found myself with some spare brain cells and a hankering for some mindless yet portable weaving, so I sat down one afternoon with a large cocoa and several how-tos and figured it out.
 |
| The first band. 7-8 mm wide, using 20/2 weaving cotton. 31 warp ends. I forgot to time the warping, but it took 1 hour, 40 minutes to weave (I warped it with a shorter path than the subsequent bands, since this was a test). |
And then I made another one.
 |
| About 1.25" wide, using doubled sewing thread (the blue) and sewing thread-weight weaving yarn (the brown and peach). 105 doubled warp ends. 3 hours, 17 minutes to warp and weave. |
- And another one. Honestly, the speed with which you can turn out an inkle band is almost terrifying.
 |
| 1.25" wide, made of the same peach and brown sewing thread-weight weaving yarn as the last band. 105 doubled warp ends. 80 minutes to warp, 2 hours 52 minutes to weave. |
- It was at about this point that I was folding one of my nicer polo shirts to put away, and I found myself thinking: this has twill tape under the button placket and on the side vents. What if I weave my own tape and use it on the shirt I'm making?
And so I did. And because of who I am as a person, I made it as gay as possible. (This blog is named after a gay space lizard. If you didn't see this coming, I don't know what to tell you.)
It turns out I really like using sewing thread for these bands. It's relatively easy to find, the lower quality stuff (which I would never run through a machine) works just fine for weaving, and it comes in about eleven thousand different colours. And unlike embroidery floss, I don't have to faff about with 8 yard lengths - just keep running it off the spool until you've got the correct amount warped, or the spool is empty.
 |
| The kate that came with my Ashford spinning wheel also makes a fantastic thread holder when I'm warping. |
- So I spent a bit of time refreshing my knowledge of pride flags, then went digging through my sewing threads for possibilities. The first pass produced an extremely wobbly genderqueer ribbon, destined for sleeve plackets.
 |
| 30 doubled warp threads, 10 of each colour. About 8mm at the narrowest and 12mm at the widest, and with really questionable edges through the first half. 27 minutes(!) to warp, 4 hours 12 minutes to weave. |

I debated putting it on the inside, so it would cover the overlocking, but then I wouldn't be able to show off my (questionable) weaving skills.

Luckily, my next band gave me no such troubles. My only regret is that I ran out of green while warping this band, so I'll have to wait until I get more to weave more rainbows.
 |
| ~1.25" wide. 80 doubled warp ends, 10 per colour. 4 hours to warp and weave. |
Actually, I have two regrets. I should have beaten the weft more firmly while I was weaving - I spent a lot of time concentrating on my selvedges, given the disaster I'd just finished, so sections of the trim are a bit loose. It made it hard to stitch the trim in place along the neck slit of the shirt.
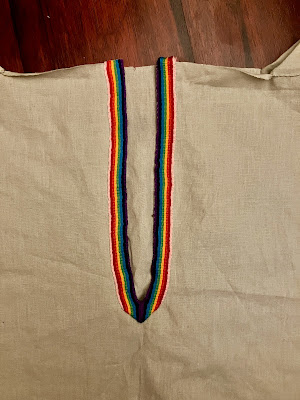
Part of the wobbliness here is my stitching, part is the band. Having such big gaps between the weft threads makes the band much more drapey, but harder to sew firmly in place. - And of course, there's the currently in-progress band - an ace pride band started in ace pride week. I don't yet know the fate of this band, but it will find a use sooner or later.

 |
| 84 doubled warp threads total - 20 each in the middle, and 22 each on the outer stripes. |
- I'm really loving how fast adding interest to my wardrobe is with these bands, compared to most other methods I've tried. A nice bonus is that they work really well to reinforce areas that see more wear, or need patching, such as the edges of cuffs or along seams.
No comments:
Post a Comment